User Guide
Installation
The latest version of Omniscape.jl requires Julia version 1.5.4 or greater. You can install Julia here. Once installation is complete, open a Julia terminal and run the following code to install Omniscape.jl.
using Pkg; Pkg.add("Omniscape")If you want to install the latest (unreleased) development version of Omniscape.jl, you can get it by running:
using Pkg; Pkg.add(PackageSpec(name = "Omniscape", rev = "main"))Don't forget to "watch" the Omniscape.jl repository on GitHub to be notified of new releases!
Running Omniscape
For detailed examples of how to use Omniscape, check out the Examples section. Omniscape.jl provides a single user-facing function: run_omniscape.
run_omniscape() offers two methods. The first, shown above, accepts the path to an INI file that specifies file paths for raster inputs and other user-specified options. An INI file can be created using any text editor (e.g. notepad) and saved with the .ini file extension. The following code block shows an example INI file. The headings in square brackets are not required. They are there for organization purposes and are ignored by run_omniscape().
[Required]
resistance_file = resistance_surface.tif
radius = 100
block_size = 5
project_name = output/example

[General options]
source_from_resistance = true
r_cutoff = 50
calc_normalized_current = true

parallelize = true
parallel_batch_size = 20

[Output options]
write_raw_currmap = true
The second method of run_omniscape accepts in-memory objects representing resistance and other spatial data inputs, and a dictionary specifying Omniscape settings and options.
The full suite of settings that are supported are described in detail in Settings and Options below.
Parallel Processing
Omniscape uses parallel processing by default, but currently, Julia requires that the number of parallel threads to use be specified by an environment variable called JULIA_NUM_THREADS. This environment variable needs to be defined prior to launching Julia. The following examples demonstrate how to set JULIA_NUM_THREADS and start up Julia to use 4 threads from your terminal.
On Linux/Mac
export JULIA_NUM_THREADS=4
julia
On Windows
set JULIA_NUM_THREADS=4
julia
For Julia versions 1.5 and greater, you can now specify the number of threads with the -t flag when running Julia, e.g.:
julia -t 4Settings and Options
Required
resistance_file: The path to the resistance layer input. This file can be in ASCII (.asc) or GeoTiff (.tif) format. If the file is in .asc format, Omniscape will also detect and use any associated .prj file in the same directory to determine the projection of the input file. The same applies for all other inputs described below that may be in .asc format.
radius: A positive integer specifying the radius in pixels of the moving window used to identify sources to connect to each target.
project_name: The name of the project. Omniscape will create a directory called project_name in the directory from which you run Julia, and write any outputs to that directory. Supports the use of full path specification (e.g. path/to/directory).
If source_from_resistance (described below) is false:
source_file: The path to the source layer input. Must be an ASCII or GeoTIFF. This raster must have the same dimensions as resistance_file, and it is recommended that they have the exact same projection to ensure proper alignment. NoData values will be assigned a source strength of 0. Does not need to be provided if source_from_resistance = true.
Optional
General Options
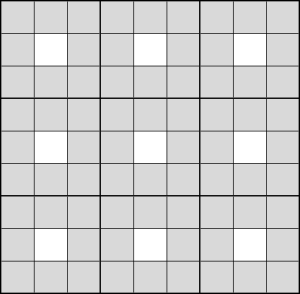
block_size: An odd integer. Defaults to 1. An odd, positive integer specifying the side length for source layer blocking in target generation. The block size option coarsens the source strength surface for the purposes of identifying target pixels and assigning source strength values. The figure below shows two source strength grids. On the left is the case when block_size = 1. In this scenario, every pixel in the grid with a source strength greater than 0 (or, if specified, source_threshold, described below) will be a target pixel, and there will be a Circuitscape solve for each one of these pixels. The figure below and to the right represents the case when block_size = 3. In this case, the source strength grid is broken up into chunks of 9 pixels (3x3 blocks), each shown with a thick black outline. Only the centers of these 3x3 blocks (the white pixels) will be considered as potential target pixels. The maximum number of Circuitscape solves for this source grid is reduced from 81 when block_size = 1 to just 9 when block_size = 3. In the block_size = 3 case, the white pixels will be assigned a new source strength equal to the sum of the 9 pixels in the 3x3 block after setting any pixels with a source strength less than source_threshold to 0. This ensures that the total amount of current injected will be the same regardless of the value of block_size. Using a block_size > 1 can significantly reduce compute times and result in only negligable differences in the cumulative current map output.
 |
 |
source_from_resistance: One of true, false. Should a source layer be derived using the resistance layer? If true, sources are calculated as the inverse of the resistance layer, and therefore it is not recommended that your resistance layer contain values less than 1. Sources will be set to 0 for all cells with a resistance greater than r_cutoff (described below). Defaults to false.
resistance_is_conductance: One of true, false. Defaults to false. Specify whether the file specified by resistance_file is a conductance (rather than resistance) surface. Conductance is the inverse of resistance. Note that r_cutoff (an optional setting described below) must be in units of resistance even if a conductance file is supplied as input.
r_cutoff: The maximum resistance value a cell can have to be included as a source. Only applies when source_from_resistance = true. Defaults to Inf (which allows all cells to be considered as sources regardless of the resistance value).
buffer: A positive integer. Defaults to 0. Specifies an additional buffer distance beyond radius to clip the resistance and source layers to for each moving window iteration. Any source pixels beyond the radius but within the buffered area are set to 0. If 0, resistance and source layers will be clipped to a circle of size radius for each moving window iteration.
source_threshold: Positive number. Defaults to 0. Only pixels in the source layer greater than source_threshold will be included as sources.
calc_normalized_current: One of true, false. Defaults to false. Specify whether to calculate normalized current flow. Normalized current is calculated as raw current divided by flow potential. If true, a normalized current flow raster called "normalized_cum_currmap" (with either .tif or .asc extension, see write_as_tif below) will be written to the project_name directory.
calc_flow_potential: One of true, false. Defaults to false. Specify whether to calculate flow potential. Flow potential calculates current flow in "null" conditions, where the resistance of the entire landscape is 1. If true, a flow potential raster called "flow_potential" (with either .tif or .asc extension, see write_as_tif below) written to the project_name directory. This can still be set to false even if calc_normalized_current = true if you want to avoid writing the flow potential raster to disk.
allow_different_projections: One of true, false. Defaults to false. If true, warnings about non-matching projections are suppressed.
connect_four_neighbors_only: One of true, false. Defaults to false. Circuitscape creates a graph (network) by connecting cells to their four or eight immediate neighbors. The default is eight (four cardinal and four diagonal neighbors). Set connect_four_neighbors_only to true if you want to connect cells to their four cardinal neighbors only.
solver: One of "cg+amg" or "cholmod". Defaults to "cg+amg". The linear solver method to use in Circuitscape. See the Circuitscape.jl paper, Anantharaman et al. (2019), for more information.
Resistance Reclassification
Omniscape.jl allows you to reclassify categorical resistance surfaces internally based on a user-provided reclass table. This allows the user to avoid reclassifying rasters manually in a GIS, and can streamline your workflow.
If instead of a resistance raster, you provide Omniscape a conductance raster, then conductance is what Omniscape will reclassify based on the provided reclass table.
reclassify_resistance: One of true, false. Defaults to false. Do you want Omniscape to reclassify your resistance/conductance raster using a reclass table that you provide?
reclass_table: If reclassify_resistance = true, the file path to the reclass table you wish to use. The reclass table is a two column, tab-separated .txt file. The first column contains the original resistance values in the resistance surface, and the second column specifies what those values should be changed to. You can reclassify values to missing to replace them with infinite resistance (NoData). Note that you don't need to include an entry for every value in your original raster. If you only want to reclassify two specific resistance values, then only include entries for those two values.
Example reclass_table.txt:
1	3
2	5
3	1
4	2
5 missingwrite_reclassified_resistance: One of true, false. Defaults to false. Should the reclassified resistance/conductance raster be saved to the output folder?
Processing Options
parallelize: One of true, false. Defaults to true. Specify whether to use parallel processing.
parallel_batch_size: Integer. Defaults to 10. The batch size (number of jobs) to send to each parallel worker. Particularly in cases where single solves are very fast, setting this to a larger number can reduce I/O overhead when scheduling/sending jobs to parallel workers. If set too high, then you will not be fully utilizing parallel workers.
precision: One of single, double. Defaults to double. Single precision uses less memory, but is less accurate than double precision. In certain cases (e.g. with extremelely large resistance values and/or extremely small source strengths), computations with single precision may be subject to numerical underflow, resulting in incorrect results. Use single precision with caution.
Output Options
write_raw_currmap: One of true, false. Defaults to true. Save the raw cumulative current map to disk? Should always be set to true unless calc_flow_potential, calc_normalized_current, or both are true and you do not need the raw current output. If true, the cumulative current map is saved to disk as a raster called "cumcurrmap" with either a .tif or .asc extension (see `writeastifbelow) in theprojectname` directory.
mask_nodata: One of true, false. Defaults to true. Specify whether to mask current flow outputs according to NoData values in resistance surface. (i.e. pixels in current flow outputs that line up with NoData values in resistance are set to no data if mask_nodata = true).
write_as_tif: One of true, false. Defaults to true. Should outputs be written in tif format? If false, outputs are written in .asc format.
Conditional Connectivity Options
conditional: One of true, false. Defaults to false. Should conditional source/target matching be used? That is, should a given target only be connected to sources that meet similarity conditions to the target? If false, none of the options described below are needed. If true, then gridded data with values for each pixel are used to compare targets and sources and determine which pairs should be connected according to user-specified criteria.
n_conditions: One of 1, 2. Defaults to 1. The number of conditions to use for conditional source/target matching.
If n_conditions = 1:
condition1_file: The file path to the data representing condition one in present day. Only needed if conditional = true. Must be an ASCII or GeoTIFF. This raster must have the same dimensions as resistance_file, and it is recommended that it also has the exact same projection to ensure proper alignment. Ensure that every pixel in the source strength raster has a corresponding value (not NoData) in condition1_file.
comparison1: One of within or equal. Defaults to within. How should conditions be compared when determining whether to connect a source/target pair. If within, then the value of condition 1 for the source must be within the following range, where target is the value at the target pixel or block: (target + condition1_lower, target + condition1_upper). condition1_lower and condition1_upper are explained further below. If equal, then the value at the source pixel must be equal to the value at the target pixel.
condition1_lower: Number. Only required if comparison1 = within. If condition1_lower = -1, then a source may have a condition 1 value up to 1 unit smaller than the target's value to be connected.
condition1_upper: Number. Only required if comparison1 = within. If condition1_upper = 1, then a source may have a condition 1 value up to 1 unit larger than the target's value and it will still be connected.
If n_conditions = 2:
condition2_file: The file path to the data representing condition two in present day. Only needed if conditional = true and n_conditions = 2. Must be an ASCII or GeoTIFF. This raster must have the same dimensions as resistance_file, and it is recommended that it also has the exact same projection to ensure proper alignment. Ensure that every pixel in the source strength raster has a corresponding value (not NoData) in condition2_file.
comparison2: One of within or equal. Defaults to within. Only applies if n_conditions = 2. How should conditions be compared when determining whether to connect a source/target pair. If within, then the value of condition 2 for the source must be within the following range, where target is the value at the target pixel or block: (target + condition2_lower, target + condition2_upper). condition2_lower and condition2_upper are explained further below. If equal, then the value at the source pixel must be equal to the value at the target pixel.
condition2_lower: Number. Only required if n_conditions = 2 and comparison1 = within. If condition2_lower = -1, then a source may have a condition 2 value up to 1 unit smaller than the target's value and it will still be connected.
condition2_upper: Number. Only required if n_conditions = 2 and comparison1 = within. If condition2_lower = 1, then a source may have a condition 2 value up to 1 unit larger than the target's value and it will still be connected.
Using future conditions:
compare_to_future: One of none, 1, 2, or both. Which condition(s) should compare the future condition in targets with present-day conditions in sources when determining which pairs to connect? For any condition(s) specified in this option, two data layers are needed: one with future condition values for all pixels in the study area, and one for present day condition values for all pixels in the study area. Defaults to "none".
condition1_future_file: The file path to the data representing condition one in the future. Only needed if compare_to_future = 1 or compare_to_future = both. Must be an ASCII or GeoTIFF. This raster must have the same dimensions as resistance_file, and it is recommended that they have the exact same projection to ensure proper alignment. Ensure that every pixel in the source strength raster has a corresponding value (not NoData) in condition1_future_file.
condition2_future_file: The file path to the data representing condition two in the future. Only needed if n_conditions = 2 and compare_to_future = 2 or compare_to_future = both. Must be an ASCII or GeoTIFF. This raster must have the same dimensions as resistance_file, and it is recommended that they have the exact same projection to ensure proper alignment. Ensure that every pixel in the source strength raster has a corresponding value (not NoData) in condition2_future_file.
Omniscape in Docker
A Docker image with the latest version of Omniscape is available on Docker Hub. To pull the image and start the Docker container from your terminal, navigate to the directory containing your Omniscape input files via cd and run the following code (set JULIA_NUM_THREADS to the number of threads you want to use for parallel processing):
On Linux/Mac:
docker run -it --rm \
	-v $(pwd):/home/omniscape \
	-w /home/omniscape \
	-e JULIA_NUM_THREADS=2 \
	vlandau/omniscape:latest
On Windows (via Windows Command Line):
docker run -it --rm^
 -v %cd%:/home/omniscape^
 -w /home/omniscape^
 -e JULIA_NUM_THREADS=2^
 vlandau/omniscape:latest
The -v flag and subsequent code will mount the files in your current working directory and make them available to the Docker container (which is why you need to run the code above from the directory that contains your input files). Once you're in Julia in the Docker container, you're ready to go! Make sure that the file paths in your .ini file are relative to the working directory from which you ran Docker.